I've seen a lot of posts about photography for beginners. I'm no beginner, and a lot of those posts made *my* head spin with technical jargon and the amount of information -- even though I already knew it all.
More and more people are buying DSLRs these days without any knowledge or training in photography. Hey, guess what? I had no knowledge or training before I got my (film) SLR either. I did take a photography class when I was in college that helped me understand the technical aspects, but my skills didn't REALLY improve until I got a DSLR and was really able to practice.
What I found most overwhelming with most of the photography guides I read was the sheer volume of tips and information. If someone could master all of that just by reading the guide, they could go from terrible to amazing in 5 minutes. But it doesn't work that way. Photography is not just *a* skill, but a set of skills that you stitch together one at a time as you get better. You have to start with one skill. Just one. Learn about it, practice it, get comfortable with it. Then repeat with the next skill. This isn't a fast process. Each skill probably takes a few weeks to master/get comfortable with IF you are taking pictures frequently. I already had a fair concept of composition and the technical aspects of photography. I got my DSLR almost a year ago, and I am still learning.
If you want to read this all at once, fine. However, you are running the odds of it overwhelming you. You really need to focus on one thing at a time. Seriously, if I weren't so lazy, I'd put each of these in a separate blog post to emphasize the point that you shouldn't rush through them or try to do them all at once. I'll say it again: TAKE ONE AT A TIME. READ IT, PRACTICE IT, AND THEN GO ON TO THE NEXT ONE AFTER YOU ARE COMFORTABLE WITH IT. Here's the order I'd recommend a newbie learn new skills:
1. (No) Flash
I know I just said most skills take a few weeks to master, but this is the exception. To master this one, you may need to read your manual or google how to change the settings on your camera. But, this skill is pretty easy. Turn. Off. Your. Flash. Don't use it unless you absolutely have to - and understand that if you do have to, the quality of your image will decrease. While learning your skills, take pictures outside or by brightly lit windows. Use natural light. If you want to spend some time playing with your camera to figure out how much light you need to be able to take a picture without your flash, by all means go ahead. Then move on to the next skill.
2. Composition
Learn about the Rule of Thirds. Notice that frequently, a photo is more appealing if a subject isn't dead center. Even knowing this, it took me a long time to get out of the habit of putting someone's face in the center of the frame. Leave your camera in one of the full auto modes for now. (I used the full auto mode for taking pictures of food when I first got my Nikon D5100 because it gave a slightly blurry background.) Just focus on getting decent composition. When you look at a photo by someone else that you like, ask yourself where the photographer must have been standing (or sitting or squatting or laying) to get that shot. Take photos from different angles. Get down low when taking pictures of children. Start noticing when distracting things are in the front or back of your photo that you can crop out. When you feel like you've got a decent grasp of composition, move on to the next skill.
3. Lighting
Study your photographs and other people's photographs to see what works and what doesn't with the lighting. Is the bright sun overhead causing harsh shadows on the face? Or is the low sun behind the subject making their hair glow? That can be a very sweet and angelic effect, but that's only a good thing if you are doing a sweet and angelic photoshoot. As you look at photographs, think about where the light source was in relation to the subjects. Above? In front of? Behind? To the side? Are they in the shade? Often times the best light for taking portraits is on overcast days because there are no harsh shadows. On bright days, it is often best to put your subject in the shade for even lighting. But there are no hard and fast rules. I have seen some photographers who have beautifully mastered shooting in full-sun.
Go play with light. Take the same or similar picture in several different light settings or angles. I remember many years ago, I took a picture of a girl leaning back on an embankment. Then I walked around and took a picture from the other side to get a different angle. I didn't do it to learn about light, but it ended up teaching me anyway. Even though she was in the exact same spot and the exact same post, from one side the light accented problem areas and made her look chunky. From the other side, the light disguised them. I was stunned. Don't just play with outdoor light; play indoors too. See what your pictures look like using the lights in your home. See what they look like standing by a window, looking out it, or facing away from it. Experiment. It's the only way to learn.
4. Focus
Leave your camera in one of the auto modes, but switch your lens to manual focus. This is crucial if you ever want to be able to take those photos with super shallow depths-of-field (where a lot of stuff is out of focus) and have one specific area in focus. The odds that your auto-focus will correctly focus on the right spot are low. And you might even end up with some lenses that don't have an auto-focus option. Learning how to focus on something took me awhile. When you are looking through an itty bitty little viewfinder, it can be very hard to tell the difference between "in focus" and "slightly off". The only way to master it is to practice it. When I took my photography class, they recommended focusing on a glint of light reflecting off something. That never worked well for me -- trying to determine when a glint of light was in focus -- but it might work for other people. I generally try to use eyelashes as a focal guide. When not in focus, eyelashes blur into a dark blob. When in focus, you can see the individual lashes. Of course, this is only helpful if you are taking pictures of people. Tip from the been-there-done-that club: If you are finding it very difficult to tell when your shot is in focus, make sure you have adjusted your viewfinder for your eye. You adjust it with the little wheel that is generally right by the area you look through. I'd recommend turning back on your auto-focus, focusing your camera on something, then looking through the viewfinder while moving the wheel until the image looks sharpest to your eye.
5. Technical Jargon
Take some time to learn about the technical aspects of how photos are made. You can probably learn to take excellent photos and learn how the different settings affect each other without understanding why. If the technical jargon makes no sense to you, it doesn't mean you'll never be able to master the skills. If it does make sense to you, it may make mastering them a little easier.
Your camera captures an image by taking in light. The amount of light that goes in to the camera is controlled in 2 ways: Aperture and Shutter Speed. A certain amount of light is needed for a properly exposed photo. Too much light, your picture is too bright or even solid white. Too little light, your picture is too dark or even solid black. The Aperture is the thing that decides how much light to let in to your camera at one time. Shutter Speed is how long light is allowed to enter the camera.
Here is the best analogy I've got to understand this relationship: Say you have a container that you need to fill with water and a funnel that the water has to go through to get into the container. The wider the funnel, the more water that gets through at one time, like Aperture. So to fill the container with water (that is, to get proper exposure), the water is going to have to be allowed to run longer with a narrow funnel and shorter with a wider one. How long you let the water run is like Shutter Speed. It's easy to see that if too much water is allowed to get through the funnel, the container will overflow (overexposure), but it is also possible for the water to be cut off before the container has filled (underexposure).
Of course, it'd be much easier to properly fill a container with water because we could physically see how fast it was filling and know when to cut it off. Unfortunately, that is not the case with capturing light for an image. If filling a container with water was like getting the right amount of light for an image, you'd have to decide in advance what size funnel to use and how long to let the water run.
6. Depth of Field
Now we're going to start dabbling with some manual settings on the camera. As previously mentioned, Aperture controls how much light is allowed in at one time. This is represented in what is called an "F-stop". You'll see your aperture setting in your menu and it'll look like this: "f/11" or "f/8", etc. Always an f/ and then a number. Aperture is one of the things that controls your Depth of Field -- how much of your image is in focus and how much is blurry. The more light that is allowed in at one time, the less time it is allowed to enter. So if a bunch of light is let in at once, it's like a sucker punch of light and then it's over. Your camera didn't have a lot of time to take in all the details. SO wider Aperture = more light at once = less time for light to enter = MORE BLUR. This is how people get that blurry background effect (called a "shallow depth of field" because the "deeper" parts of the image are out of focus). Possibly counter-intuitively, f/2.8 is a larger aperture than f/11. The smaller the f-number, the larger the aperture opening is, the more light comes through at one time. If you understood all that technical stuff, great. If not, all you need to take away from it is this: The "smaller" the f-number, the less that is in focus; the "bigger" the f-number, the more that is in focus.
To practice: Put your camera in Aperture Priority mode (AV on Canon, A on Nikon). With this mode, you set the Aperture and your camera will calculate the rest of the settings for you. Play with different apertures and see what effect they give you. Especially try taking the same photograph with dramatically different Aperture settings to see what a difference it makes in how much of the background you can see.
7. Shutter Speed
Now let's play with Shutter Speed. Put your camera in Shutter Speed Priority mode (Tv on Canon, S on Nikon). With this setting, you choose the shutter speed and the camera calculates the rest of the settings for you. Shutter Speed is important when you want to freeze something that is in motion, or when you want to do the opposite and show motion in the image. I generally take people to a fountain to play with shutter speed. If you have a fountain near you, it is a good place to be able to really see the differences in settings. If not, anything that has constant movement will work. (Cars on the highway, a moving ceiling fan, a spinning bicycle wheel...) Shutter Speed is shown as whole number (unless you go above a 1 second shutter speed, but you will likely never do that for regular photos because it is pretty much impossible to keep the camera still enough to keep the image in focus without a tripod), however the Shutter Speed is *not* a whole number. It is the bottom of a fraction. So if your camera says your shutter speed is 100, your shutter speed is actually 1/100 of a second. If your camera says your shutter speed is 4, the speed is actually 1/4 of a second.
Play with the settings. Make your shutter speed faster and faster until you are able to freeze the motion of whatever you are photographing. Then slow it down a little so you can see a slight motion blur. Then slow it down a little bit more for an obvious motion blur. Slow it down still more to see a complete blur with no specific details of the object in motion.
8. Manual Mode
Now you're ready to go manual. There are guides out there to tell you what Shutter Speed to use with what Aperture setting, but I can never remember it so it doesn't help me. (If you think it'll help you, google the Sunny 16 Rule.) What does help me is the exposure meter. It looks something like this and you can see it on your screen or through the viewfinder:
+.........0.........-
Though the plus and minus might be switched or there might be different symbols used on different cameras. When the cursor is toward the +, there's too much light. Toward the -, not enough. So, I pick the setting most important to me an set that first. If I'm taking a picture of my son playing soccer, I set shutter speed first so I can make sure it's fast enough to freeze motion. If I'm taking a portrait of a still model, I set aperture first so I can control my depth of field. Then I adjust the other setting until the exposure meter shows me it is balanced (or close enough. Sometimes I prefer my shots a little bright.)
9. ISO
I rarely adjust my ISO, but it is important to know about it. ISO is "film speed". Back when I shot film, I used ISO 400 for everything because it was a decent middle-ground film speed for most settings. Now, with digital, it is so easy to change the ISO setting when needed that there is no excuse not to use the best settings.
The smaller the ISO number, the less grainy your pictures will be. ISO 100 is ideal. However, ISO 100 requires a lot of light. In darker situations, if you are faced with changing your ISO setting or using your flash, choose to change the ISO setting to a higher ISO.
10. Posing
I struggled with where to put posing in this list. In many ways, it is one of the first skills you start to practice. But I didn't feel "right" suggesting people master posing before they learned how to operate their camera to capture the different shots they might want to catch. Say the "pose" you want to capture is of a child on a swing -- shouldn't you know about selecting shutter speed for that? And depth of field helps set the mood of a photo. Without knowledge about that, your super-romantic couple's pose won't have the right feel to it. So because of that, I put it here.
Some people are naturals at thinking of poses. I'm not. I pin endless amounts of photographs onto my Pinterest boards trying to learn how different positions work together. I downloaded a posing guide app for my phone. I frequently have to refer to these things during shoots when I'm out of posing ideas. If you think this will help you, do it!
What you should *not* do is try to completely recreate someone else's photo. It just doesn't work like you want it to. Why? Because a lot of the best poses you'll see were found semi-accidentally. Someone moved their arm just right and the photographer said "There! Don't move that arm! Now do this and this." (Just an example.) The people in the portraits sort of "fall" into a lot of those positions naturally. When you try to mold someone else into that same position, it is stiff and the feeling is off. You should never look at the photo and say "Hmm, no, your head needs to be a bit more like THIS... and your hand should be a little bit more this way... and you should only have a smirk instead of a smile."
Everyone has heard before that they shouldn't copy someone else's work, but that they should make it "their own". Well, how do you do that? It starts with a little bit of imitation, like grouping a family in the same or similar way as a photo you are using for a reference. Then start changing things a little at a time. This can be your idea, or theirs. Try to get a bunch of variations of the same "pose" so you have plenty of options to choose from and not 20 pictures that look the same.
What about popular poses? Sometimes there are poses that are just super popular and people request them. Like hands making a heart around the belly in a maternity shot, groomsmen jumping in the air in a wedding picture, a man dipping a woman back while kissing her in an engagement photo, or the composite shot of a newborn baby leaning on her elbows with her head resting on her hands. By all means, do the shots. If people want them -- or even if you just want them for yourself -- do them. You probably won't get a lot of accolades from photo critics who tend to shun trendy poses, but is that who you are aiming to please?
Besides, you might stumble onto something accidentally. I decided I wanted to try out that composite shot of the baby leaning on her elbows (composite shot meaning 2+ photos are edited together in photoshop to look like 1 photo. In this case, to edit out parents' hands and make it look like the baby was in that position on her own). I explained what I planned to do to the parents, how it would work, and what I needed them to do. However, Dad had a hard time figuring out how to position the baby. I didn't get the shots to do the composite, but I didn't care. I liked the shot with Dad's arms in it better than what I'd planned to try. It feels so much more intimate. And I never would have thought of the pose if it hadn't just unfolded in front of me.

"Posing" is a lot of things. Posing is telling people how and where to stand, where to look, what to do with their bodies, etc. In this instance, posing is controlling the shot. Posing is also giving people some guidance and then allowing them to move around a little bit while still in the same basic position. Or going a step further and letting them come up with the poses entirely on their own. All of these are examples of intentional posing. But to truly master posing, you also have to learn to recognize a beautiful pose or position when you see it happen, even if it wasn't planned or what you were going for.
11. Raw
If you aren't already, it's time to consider shooting in Raw instead of JPEG. There are a few downsides of shooting in Raw. With JPEG, if you are happy with the photos, you can transfer straight from your camera and your photos are ready to use. With Raw, each photo has to be processed. (Consider JPEG like a Polaroid. You take the picture, it spits out a ready-to-go photo that the camera developed by itself. On the other hand, Raw is like film negatives. It takes more work and your photos have to be processed, but you have more control of the outcome of the photos.) When you shoot in JPEG, your camera takes all the information for the image, condenses it, applies some standard settings (contrast, etc), then saves it as a JPEG. With Raw, your camera takes in all that information and leaves it there for you to manipulate if you so choose. Shooting in Raw allows you to fix a lot of mistakes you might not otherwise be able to, such as improper white balance or exposure. Let me give an example:
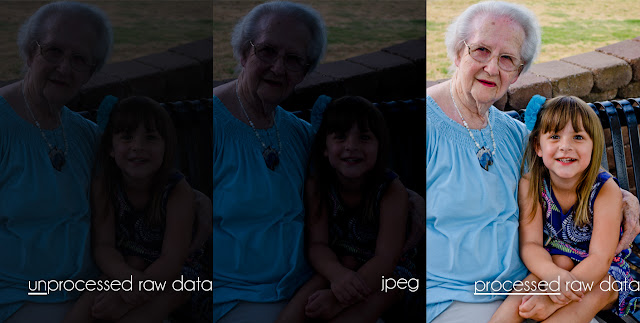
You know those shining moments when every just goes RIGHT? The stars are aligned, and you couldn't plan it better if you tried. This photo shoot was the opposite of that. I had misjudged the amount of available light there would be at a certain time, and for whatever reason whenever I was fretting over how dark the images were, it never occurred to me to change my ISO setting. I was terrified I'd botched the entire session. This image wasn't even the darkest one. There were some that were almost completely black. If I'd been shooting JPEG, the image in the middle would be what I was stuck with and I'd have to do my best to save it in photoshop. Fortunately for me, I was shooting in Raw. The image on the right is what I came up with after making some adjustments to the Raw data. So that is the image I have to work with BEFORE taking it into photoshop for additional edits.
Processing Raw photos requires a program to do so. My camera came with one called ViewNX 2. I downloaded a trial version of Lightroom, but couldn't afford it. Then I got an older version of photoshop, so now I use Camera Raw that came with that. It sounds complicated to work with the Raw data, but it isn't. You have a preview of your image, then a bunch of drop down menus or slide bars. That's it. Just moving sliders around until you like how your preview looks. Then you can either save it as a JPEG or send it to your photo editing program for any work you want to do in there.
12. Photo Editing
In order to really put the final touches on your photographs, you have to edit them. I can't teach you the specifics of editing photos because they are somewhat specific to what program you are using. Plus, that is WAY too much information to include as a final "skill" on this list. If you need to learn how to make a specific edit in your specific program, there are an unlimited amount of youtube videos and webpages. Just try typing in what you are wanting to do and the name of your program. (Ex: "remove a zit in paintshop pro").
Even though I can't tell you exactly what to do, here are some tips:
-Remove blemishes, even out skin tones
-Direct the eye's attention by dodging (brightening) and burning (darkening) the photo strategically. The eye automatically travels to the brightest thing. If you subtly make the background darker and the subject's face brighter, it'll help it stand out.
-Use enough contrast to make your photo pop, but don't over do it.
-Adjust the warmth of your photo if it looks too blue or orange
-Remove distracting objects, like a piece of trash on the ground.
--------------------------------------------------
That's as far as I can take you on this journey. My next challenge for myself is to stop relying on Auto-White Balance and start setting it myself. I'll update this post as I have more to share.


.jpg)
.jpg)


